

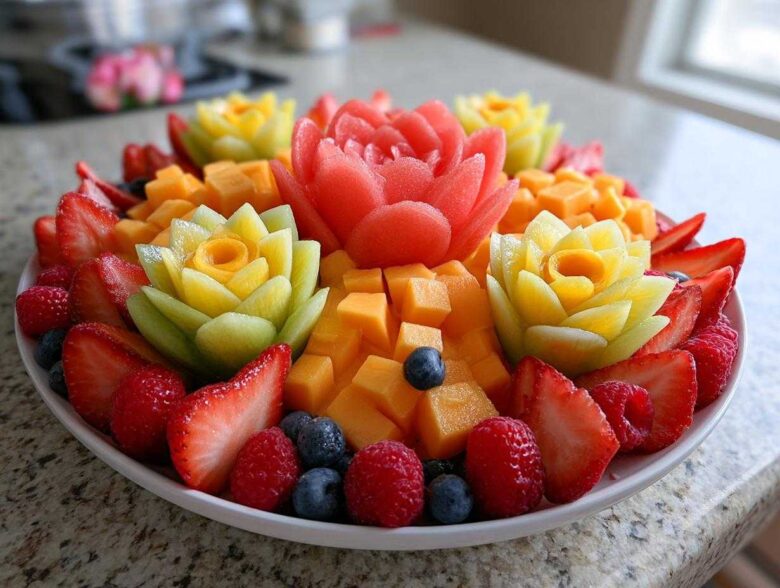
Oh my goodness, planning a baby shower or a first birthday party is just the best, isn’t it? You have all the excitement, and of course, you need a centerpiece that just screams celebration without being heavy or boring. Seriously, nothing sinks a party vibe faster than realizing you’re running out of fresh, exciting food ideas!
That’s why I totally fell in love with this idea: the **Baby Bloom Fruit Platter**. Forget those sad, flat trays of sliced melon; we are going for edible art here! When my sister was having her gender reveal last spring, I wanted something gorgeous that guests could graze on all afternoon. I wanted it to look like a giant, gorgeous bouquet made entirely of sweet, juicy fruit.
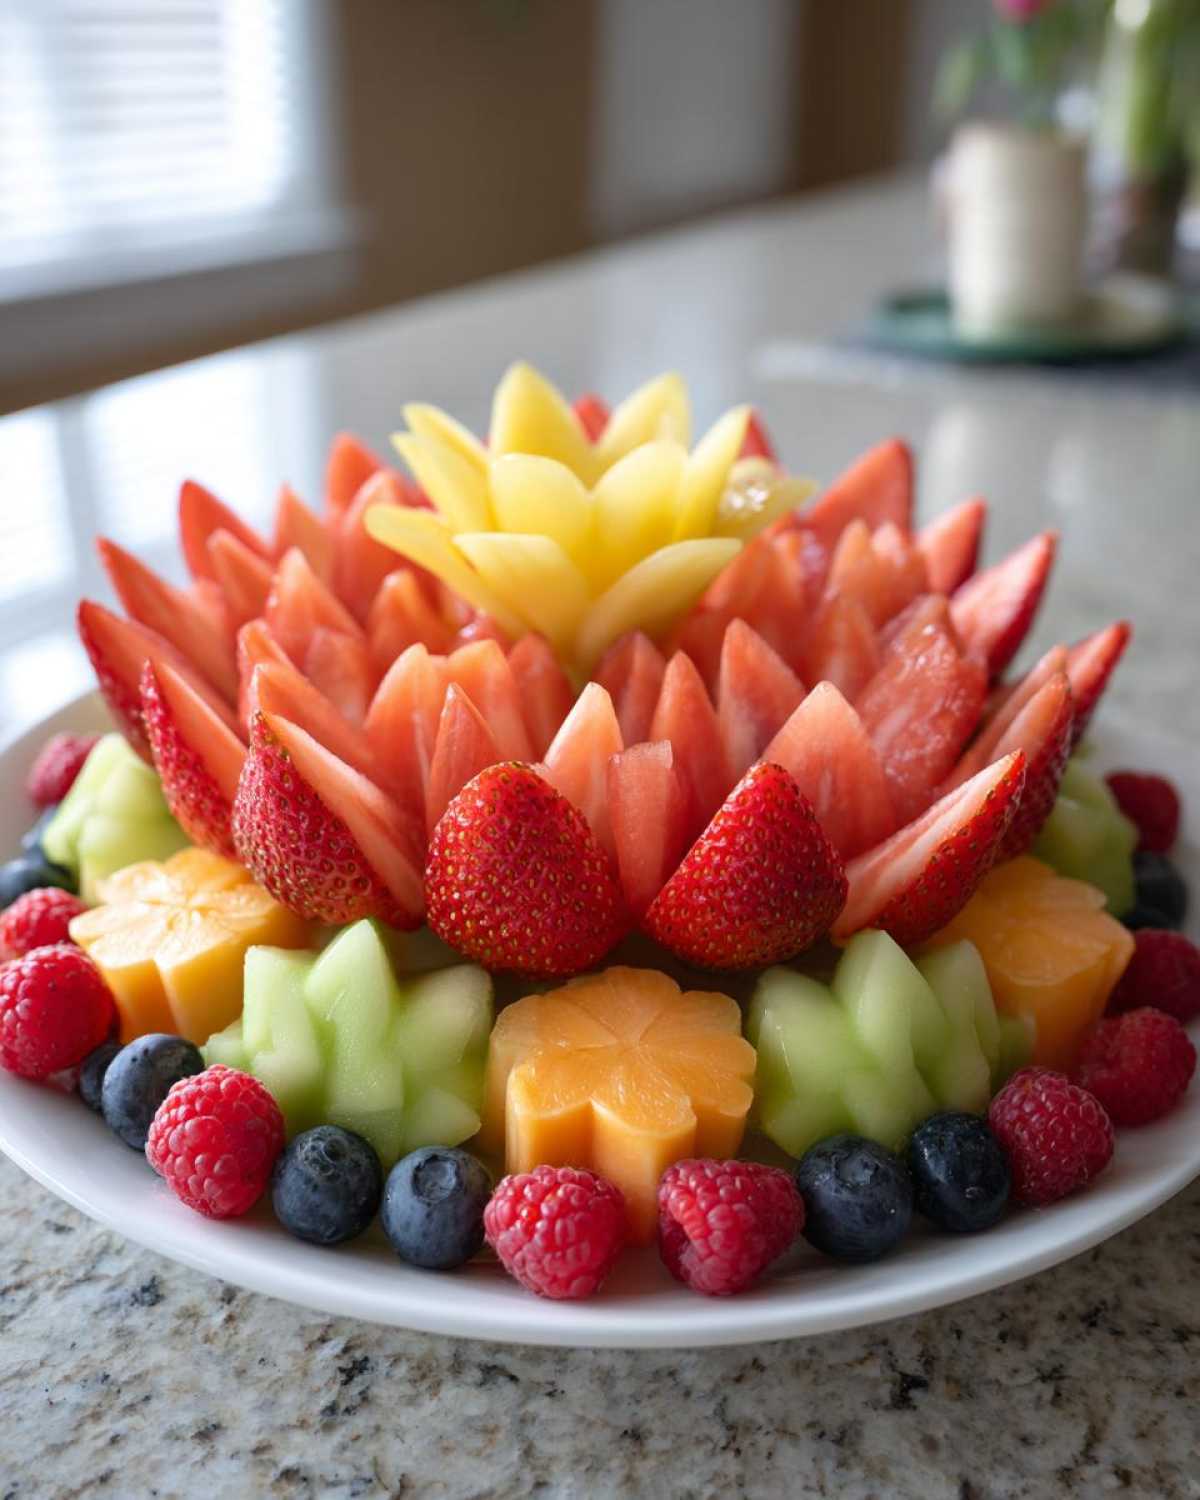
Trust me, making this stunning **Baby Bloom Fruit Platter** is so much easier than you think, and it makes everyone gasp when they walk into the room. I’m going to walk you through exactly how I arrange everything so it looks professionally styled, but really, it just takes a little patience and the right fruits.
If you want to see more about the passion that goes into my recipes, you can always check out my About Me page anytime! For now, let’s get this garden growing!
Why This Baby Bloom Fruit Platter is Your Celebration’s Star Attraction
This isn’t just a bowl of fruit, honey, it’s the whole decorative showstopper! When you are planning something as sweet as a baby shower, you need food that looks worthy of being photographed a million times. This platter delivers that elegance instantly. Don’t forget to check out the latest posts for other great entertaining tips!
- It’s naturally healthy, which is great when you have lots of moms-to-be lurking around, looking for lighter options.
- The arrangement style perfectly suits events—it’s celebratory, beautiful, and completely custom, unlike those boring pre-made trays.
- It easily functions as the main visual anchor for your food table!
Perfect for a Pastel Fruit Platter for Baby Events
That’s the key, right? We are aiming for soft, happy colors—think pale pinks from the strawberries, soft greens from the honeydew, and gentle blues from the blueberries. It feels immediately right for a **pastel fruit platter for baby** showers. It’s just cheerful!
Creating a Blooming Fruit Centerpiece Effortlessly
Honestly, you’d think this took hours, but because we are using simple shapes—cubes and flowers—the major impact comes from the arrangement, not fussy cutting. It quickly transforms into a dramatic **blooming fruit centerpiece** that people will talk about long after the last grape is gone. You’ll feel like a total rockstar host!
Gathering Supplies for Your Baby Bloom Fruit Platter
Okay, before we get into the juicy part, we need our stage set! You can’t pull off a showstopper like this **Baby Bloom Fruit Platter** without the right props. This is where a little forethought really pays off. You don’t need fancy gadgets, but a few key items make the shaping process so much quicker, which is important because who has all day when you have guests coming?
First things first: you need a brilliant base. I usually grab my largest wooden round platter—the one that’s about 16 inches across. If you’re planning for a bigger crowd, maybe think about doing a full grazing table setup instead! We need room for our fruit flowers to really sprawl out and breathe.
Essential Equipment for a Pretty Fruit Presentation
The most important tools for achieving that professional look are the shape makers. You absolutely must have a set of small, cute cookie cutters. I’m talking the tiny flower shapes, maybe a star, or even a small heart, depending on the vibe of your party. These are what turn boring pineapple chunks into adorable fruit blossoms, making this a truly **pretty fruit presentation**.
You’ll also need a sharp paring knife, obviously, and a melon baller if you’re using softer melons for foundational pieces. Keep a small bowl of water or a lemon wash station nearby for any fruit you cut that might brown quickly. Having everything ready means you can assemble this gorgeous **Baby Bloom Fruit Platter** in 30 minutes flat!
Ingredients for the Elegant Baby Bloom Fruit Platter
Alright, let’s talk about the stars of the show! The success of this **Baby Bloom Fruit Platter** totally hinges on picking fruit that is perfectly ripe and has vibrant color, because that’s what gives us that beautiful floral look. I’ve listed exactly what I use, but don’t worry if you need to swap a few things out. Remember, we want that soft, happy aesthetic—light colors that look fresh and sweet.
Here’s the foundational shopping list. Notice I put the prep right in the list; that helps keep me organized when the timer is running!
- 1 cup strawberries, halved (These become our beautiful outer petals!)
- 1 cup green grapes (Perfect for making the radiating stems or accents.)
- 1 cup cantaloupe, cubed (Great for structure and that soft orange-yellow base.)
- 1 cup honeydew melon, cubed (Essential for blending those pale green pastels.)
- 1 cup pineapple, cut into flower shapes (These are our focal flowers, cut before assembling!)
- 1 cup blueberries (The little dark blue accents that make the other colors pop.)
- 1/2 cup raspberries (For textural contrast and little bursts of deep color.)
- 1/4 cup edible flowers (If you can find them—they take this presentation up ten notches!)
- 1 large round serving platter (Your canvas!)
Fruit Selection Notes and Substitutions
When you’re at the store, give those melons a little sniff test—they should smell sweet! If you can’t find perfect honeydew, white peaches (skinned and sliced thin) can mimic that pale color wonderfully. For extra pinks, sometimes I swap some strawberries for peeled, cubed watermelon, but cut those cubes smaller so they don’t overwhelm the look. If you’re making a dip, like my favorite salsa style dips, make sure it’s served on the side so it doesn’t smudge the pristine look of our fruit!
Step-by-Step Guide: How to Assemble the Baby Bloom Fruit Platter
Okay, deep breath! We have all our beautiful, perfectly prepped fruit, and now it’s time to turn this pile of ingredients into the **Baby Bloom Fruit Platter** centerpiece. This is where the assembly magic happens, and if you follow the structure, you can’t mess it up. Seriously, it’s like building a magnificent, edible sculpture, but way tastier!
Before you even touch the fruit, make sure your large platter is clean and ready on the counter where it will stay. You don’t want to try moving this masterpiece once it’s full! If you want a refresher on getting those perfect pineapple flowers cut, hop over and check out my tips on creative fruit shaping techniques.
Creating the Central Structure and Grape Stems
We are building this layer by layer, starting from the absolute center, just like a real flower emerges! Grab a small bowl—mine is usually a little white ramekin—and nestle that right in the middle of your platter. That bowl is our hidden anchor, giving the main flower structure something to sit on later! Don’t skip this step; it keeps everything looking tall and proud.
Next, take those cubed cantaloupe and honeydew. Arrange the cantaloupe cubes first, packing them tightly around the central bowl to create a solid, slightly elevated ring. Then, scatter (but still relatively close together!) the honeydew cubes around the outer edge of that cantaloupe ring. You’re starting to see the foundation of the bloom forming, right?
Now for the stems! This is my favorite visual trick for this **Baby Bloom Fruit Platter**. Take your green grapes and lay them out in straight lines, radiating away from that center base, stretching out toward the rim of the platter. Think of them like spokes on a wheel or the long stems reaching down from the flower heads.
Arranging Petals and Filling Spaces in Your Themed Fruit Arrangement
With the base set, it’s time for petals! Take those halved strawberries and carefully place them cut-side down along those grape ‘stems’ we just laid out. You can overlap them slightly to make them look richer, creating deep, beautiful rows of red that draw the eye inward. This layering is what makes it a true **themed fruit arrangement** instead of just a pile of fruit.
Once you have your primary “petals” laid out, we fill in the gaps. Grab those blueberries and raspberries. These tiny berries are crucial for making the platter look abundant and professional. Sprinkle them into any remaining empty spaces between the larger melon blocks and the strawberry rows. The dark blueberries really make those pale honeydew wedges pop!
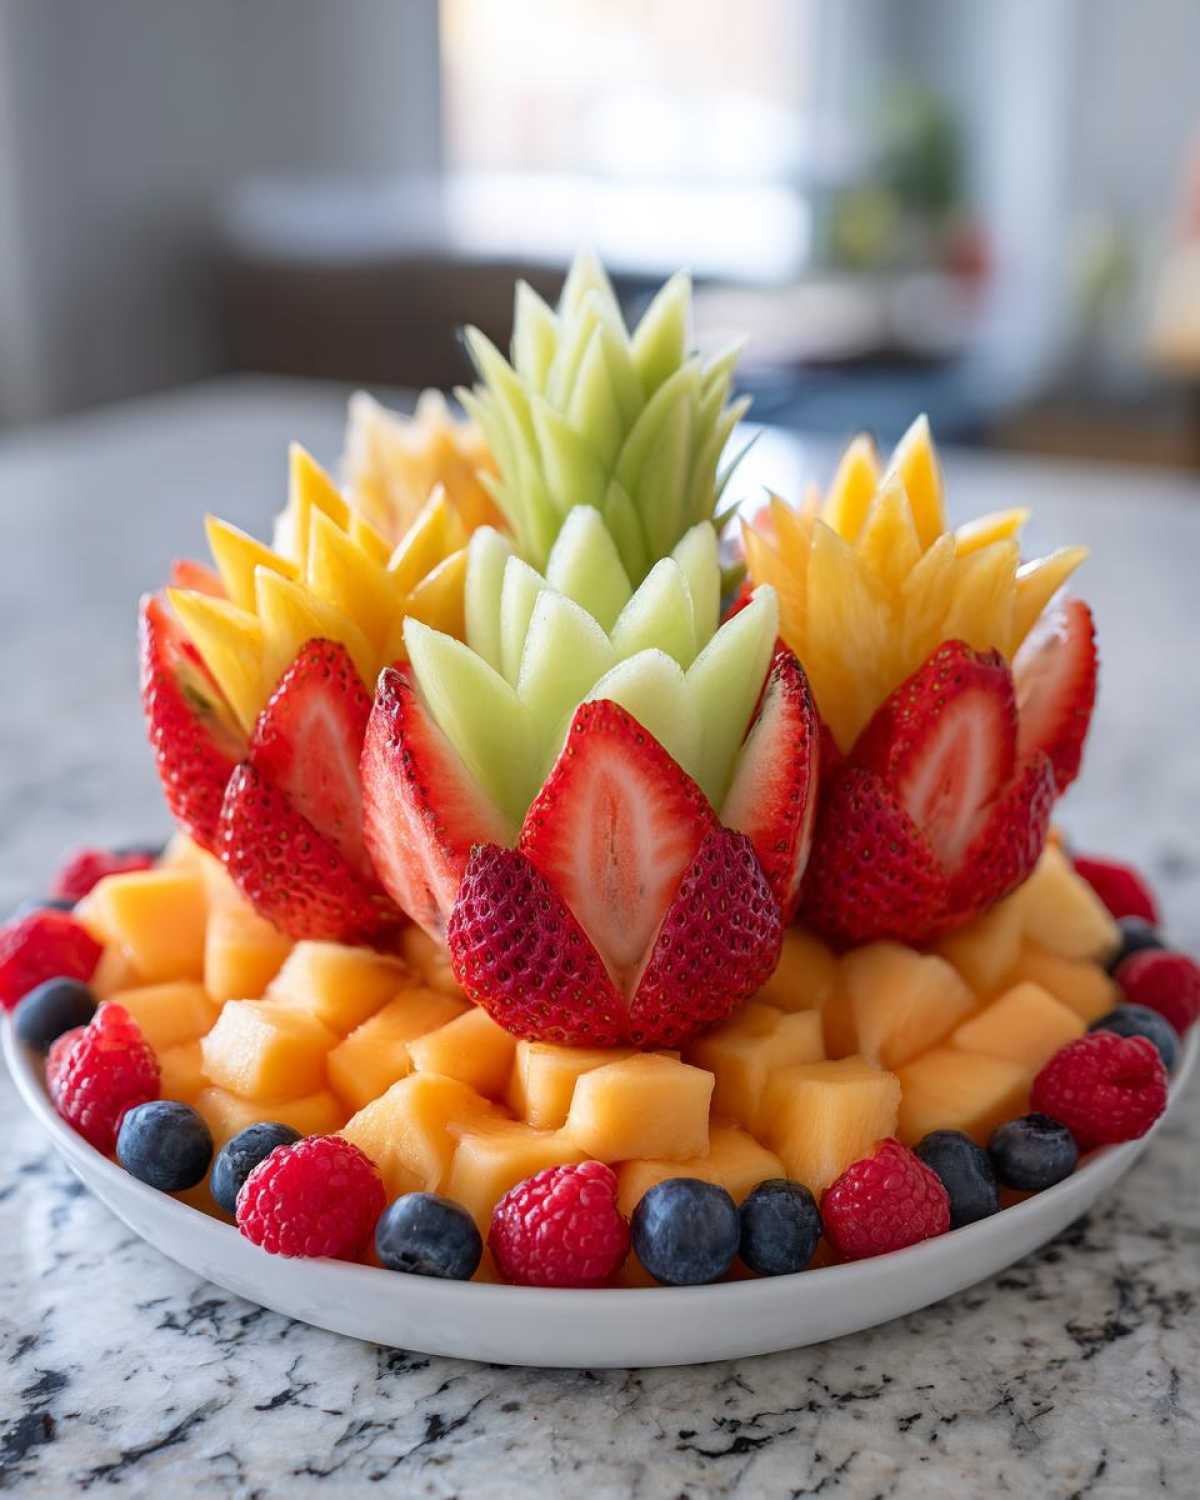
Finally, place your pineapple flower shapes right on top of the melon mounds, slightly tilted so they catch the light. If you have those delicate edible flowers, gently tuck them into any perfect little crevice you see. Boom! You’ve created a stunning, edible bouquet!
Tips for an Expert-Level Fruit Platter with Baby Theme
You’ve got the structure down, but I want your **Fruit Platter with Baby Theme** to look gorgeous for the *entire* party, not just the first hour. Keeping things fresh is my biggest pro tip for any large grazing board, especially when you’re using tender fruit like raspberries.
Listen, if you cut any apples, pears, or even bananas (though I try to avoid them for color reasons), you absolutely must brush the cut sides with lemon juice and water. It’s a lifesaver! I mix about a tablespoon of lemon juice into a half-cup of water, and I just gently use a pastry brush to glaze the surfaces. It stops that nasty browning instantly.
Also, if you are assembling this thing hours ahead of time, keep the garnishes—especially those delicate edible flowers—separate until the very last minute. Fresh flowers wilt fast when they touch juicy fruit, and we want that pop of freshness right before people start eating. If you need more advanced ideas on making your boards look incredible, my tutorial on how to make a decorative fruit board has some deeper tricks for texture!
Serving Suggestions for Your Celebration Fruit Grazing Table
So, now that you’ve created the visual masterpiece that is the **Baby Bloom Fruit Platter**, how do you make sure the rest of your food spread complements it? You don’t want to throw a heavy cheese board next to this light, airy display. For a **celebration fruit grazing table**, think about light, sweet, and slightly savory additions.
Since our platter is naturally vegetarian and gluten-free (if you skip any crackers!), it’s great to keep the accompanying snacks light too. Sometimes I’ll add little bowls of spiced nuts or some plain, crispy vanilla wafers nearby for dipping. If you need a savory anchor that still feels appropriate for a daytime shower, try my recipe for 7-Layer Dip, but serve it slightly chilled with colorful tortilla chips!
For a gender reveal, serving this fruit near small cups of yogurt parfait layered with those same pastel berries keeps the theme going beautifully. It’s all about balance, keeping the focus gentle and sweet!
Storage and Keeping the Baby Shower Fruit Board Fresh
I get asked this every time I make a big platter: what happens to the leftovers? Because this **Baby Shower Fruit Board** is so visually stunning, you want to protect that arrangement! If you’ve got leftovers, you have to treat them gently, otherwise, you’ll end up with a soggy mess later, and nobody wants that.
Here’s the tough reality: A fruit platter this perfectly arranged will only look magazine-ready for about 4 to 6 hours at room temperature. After that, the juices start pooling at the bottom of the platter, and the smaller berries get a little squished. If you absolutely need to store leftovers overnight, you have to disassemble it first. Seriously, take the pineapple flowers out and put them in an airtight container in the fridge.
When you refrigerate the whole assembled platter, condensation is your enemy! The cold air mixes with the surface moisture, creating those gross droplets that make everything slimy. If you have to chill it because the party ran long, cover it very loosely with plastic wrap—don’t seal it tight!—and try to eat the leftovers within 24 hours. But honestly, this **Baby Bloom Fruit Platter** is meant to be enjoyed fresh, so try to plan for most of it to disappear while the party is happening!
Frequently Asked Questions About This Fruit Display
When I show people how I put together a **themed fruit arrangement**, I always get the same questions popping up. It’s totally normal! You want to make sure your centerpiece looks amazing, especially for big moments like a baby’s arrival. So, I pulled together the most common things people ask me about creating this beautiful display.
Can I prepare the fruit shapes a day ahead for my fruit platter ideas for gender reveal?
This is a tricky one! For a **fruit platter ideas for gender reveal**, you absolutely want everything looking peak fresh. The cubed melons (cantaloupe and honeydew) are fine to cut the morning of the party, but I really wouldn’t cut the pineapple shapes or slice the strawberries more than two hours before serving. Fruit starts weeping juice once it’s cut, and those beautiful, sharp edges you created for your bloom will start to soften and blur.
If you absolutely must prep ahead, cut the pineapple flowers, place them on a baking sheet lined with parchment paper, cover them tightly with plastic wrap, and keep them in the fridge. You can bring them out about 30 minutes before you start assembling! My advice for keeping everything lovely is to do the heavy chopping the night before, but save the *artistic arranging* for the day of the event.
What fruits work best for an Edible Flower Fruit Display?
If you are going for that gorgeous **edible flower fruit display**, you need fruits that offer a smooth background so the delicate flowers don’t get lost! I love placing the flowers on top of the pale honeydew cubes or on the curved surface of a halved strawberry. The color contrast is just stunning.
Fruits that work well are those that are relatively flavor-neutral and don’t bleed too much color, like peeled white peaches or even sliced star fruit, if you can find it! Avoid using them directly on top of the raspberries, though; the raspberries are usually too dark and they just overwhelm the fragile look of the flower itself. If you have any questions at all while you’re preparing, feel free to send a note through my contact page!
Sharing Your Baby Bloom Fruit Platter Creation
Whew! You did it! You conquered the centerpiece challenge, and I bet your **Baby Bloom Fruit Platter** looks absolutely breathtaking right now. Seriously, when you step back and look at that edible garden you created, you have to feel proud!
That’s the best part about making food for happy events—it’s fleeting art. It’s there for a beautiful moment while everyone celebrates, and then it’s totally enjoyed!
I would be thrilled past the moon if you let me know how your assembly went! Did you use pink grapes for a gender reveal? Did you find gorgeous edible roses for garnish? Drop a comment below and tell me all about the party!
And please, if you took a picture (and I know you did!), share it on social media and tag me—I love seeing your creations blossom! Remember, every time you make one of these, you’re creating a little bit of lasting memory magic. If you ever want to dive into privacy details or anything legal about the blog, you can check out the privacy policy, but for now, go enjoy the party!
PrintElegant Baby Bloom Fruit Platter: A Centerpiece for Showers and Celebrations
Create a beautiful, flower-themed fruit platter perfect for baby showers, gender reveals, or first birthday parties using pastel and bright fruits arranged to look like blooming flowers.
- Prep Time: 30 min
- Cook Time: 0 min
- Total Time: 30 min
- Yield: 8 servings
- Category: Appetizer
- Method: Assembly
- Cuisine: American
- Diet: Vegetarian
Ingredients
- 1 cup strawberries, halved
- 1 cup green grapes
- 1 cup cantaloupe, cubed
- 1 cup honeydew melon, cubed
- 1 cup pineapple, cut into flower shapes
- 1 cup blueberries
- 1/2 cup raspberries
- 1/4 cup edible flowers (optional, for garnish)
- 1 large round serving platter
Instructions
- Wash and prepare all fruit according to the ingredient list. Use a small cookie cutter to shape pineapple pieces into flowers.
- Start by placing a small bowl or ramekin in the center of your platter to act as a base for the main ‘bloom’.
- Arrange the cantaloupe and honeydew cubes around the center base to form a large circular border.
- Create ‘stems’ by placing lines of green grapes radiating outward from the center base toward the edge of the platter.
- Arrange the halved strawberries, cut-side down, along the grape lines to mimic flower petals or leaves.
- Fill the spaces between the larger fruit sections with blueberries and raspberries to add color contrast and fill gaps.
- Place the pineapple flower shapes strategically on top of the larger fruit sections for a focal point.
- If using, gently place edible flowers among the fruit for an added decorative touch.
- Serve immediately or cover and chill until ready to present.
Notes
- For a gender reveal, use pink or blue grapes for the ‘stems’ to hint at the baby’s gender.
- To keep the fruit fresh longer, lightly brush cut apples or pears (if used) with a mixture of lemon juice and water.
- Use toothpicks to secure any taller fruit pieces if your platter needs to travel.
Nutrition
- Serving Size: 1/8 platter
- Calories: 110
- Sugar: 18g
- Sodium: 5mg
- Fat: 0g
- Saturated Fat: 0g
- Unsaturated Fat: 0g
- Trans Fat: 0g
- Carbohydrates: 28g
- Fiber: 3g
- Protein: 1g
- Cholesterol: 0mg