

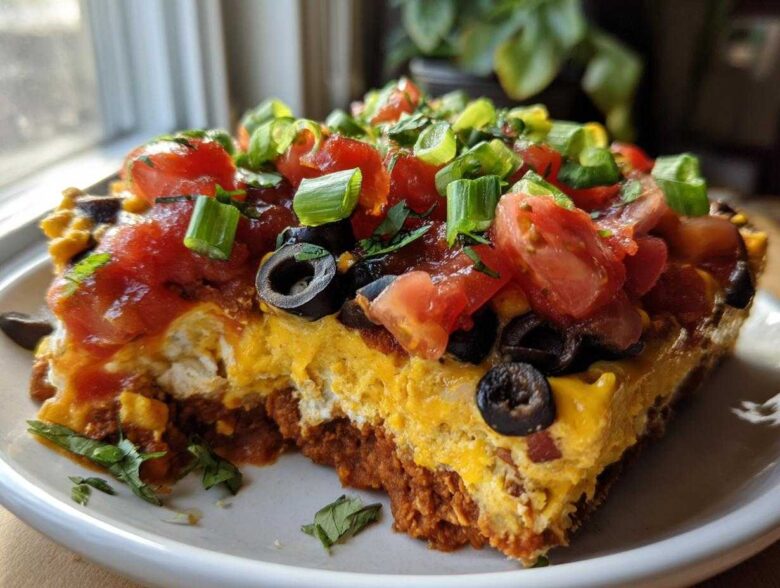
Oh my goodness, if you are looking for the absolute showstopper at your next potluck or game day party, stop scrolling right now! I totally get it—finding a vegan appetizer that stands up to the usual cheesy, creamy contenders can be rough. But trust me, I have cracked the code. After years of fiddling with questionable store-bought substitutes that leave everyone disappointed, I finally perfected this Vegan 7-Layer Dip with Cashew Queso, and it gets devoured every single time.
This isn’t your grandma’s dusty old dip recipe, unless your grandma was secretly planning a plant-based revolution! The magic here isn’t just in the seven beautiful layers; it’s that rich, slightly tangy cashew queso—it mimics dairy cheese better than anything I’ve ever tasted. I’ve messed up enough batches of cashew cream to know what works, and this ratio is spot on. If you’re new to making dairy free party dip recipes, this might look intimidating, but honestly, assembly takes less time than baking cookies! You can learn more about my cooking journey right here, but for now, let’s get dipping!
Why This Vegan 7-Layer Dip with Cashew Queso is the Best Vegan 7 Layer Dip Recipe
I know what you’re thinking: seven layers? Sounds like work! But I promise you, this Vegan 7-Layer Dip with Cashew Queso is worth every single spoon of effort, mostly because there’s no actual cooking involved! It’s all about stacking gorgeous, flavorful components, and the visual payoff is huge. This dip is famous at our house for vanishing first.
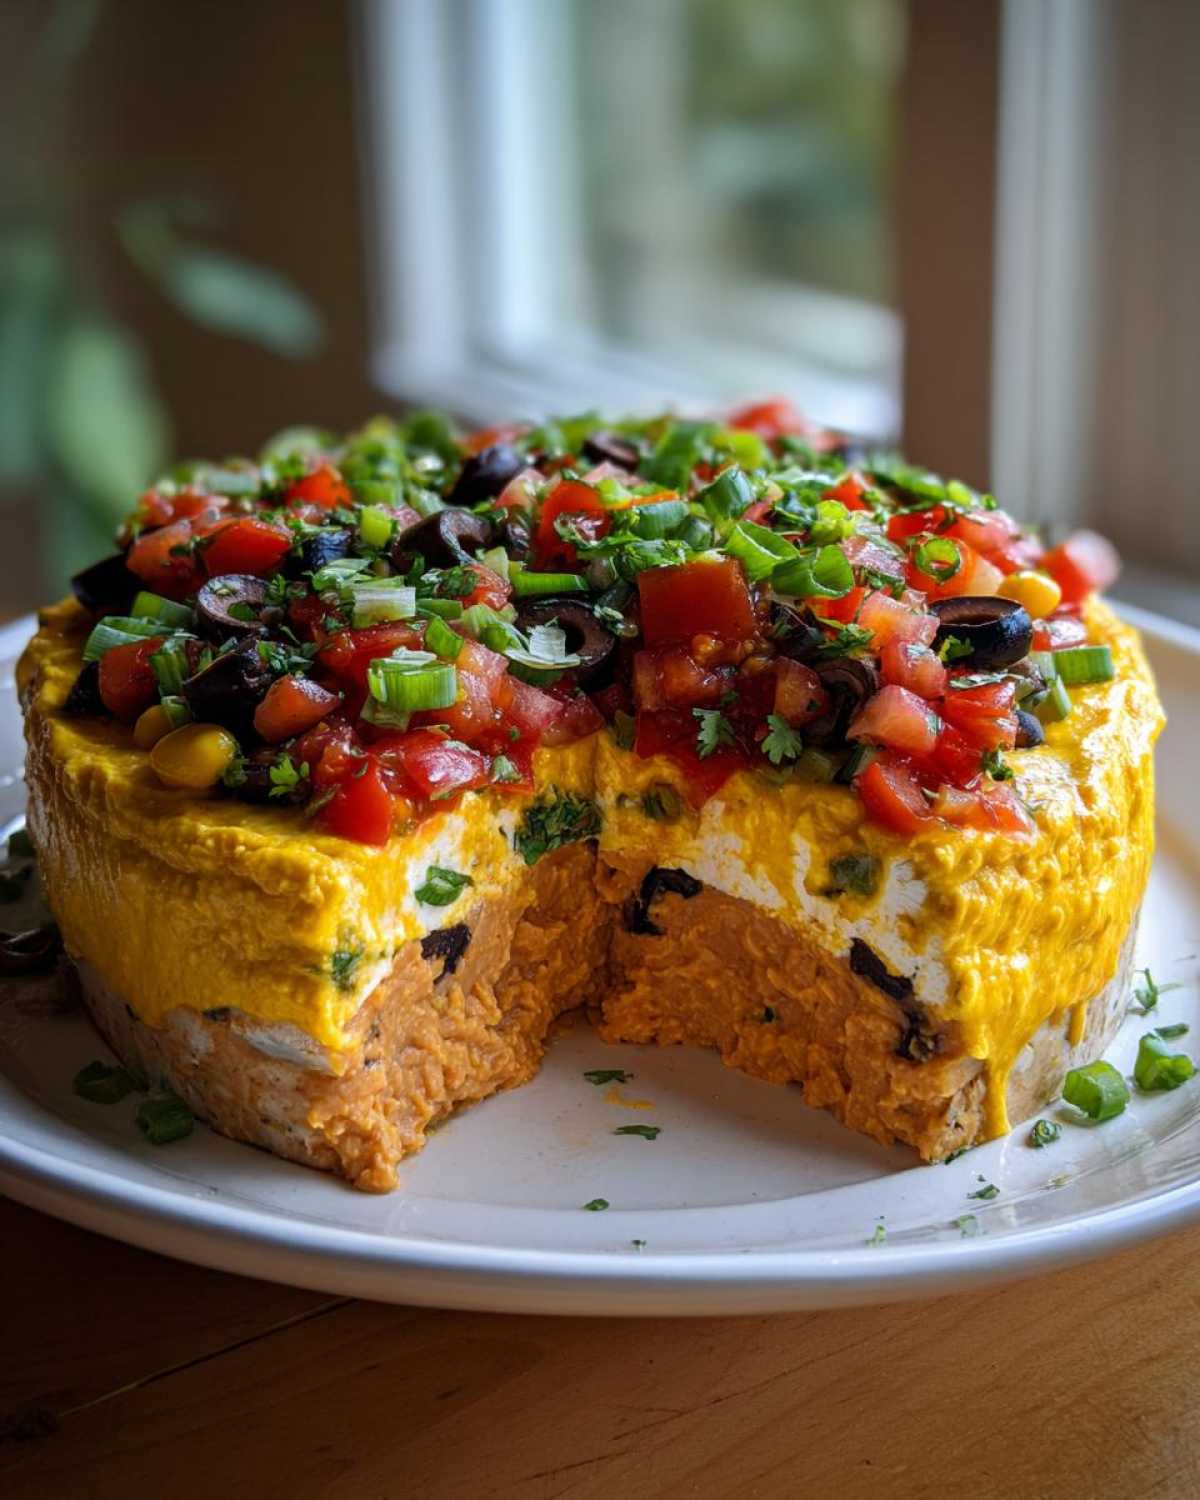
Flavor Profile and Texture Highlights
What sets this apart? The cashew queso, hands down. It’s smooth, rich, and brings that savory depth we all crave in a cheese layer. We contrast that with the cool, tangy vegan sour cream and the spicy kick from the salsa. When you scoop it up, you get cold, creamy, spiced, and fresh all in one bite. It’s an absolute textural dream!
Quick Assembly for Entertaining with Vegan Dips
Honestly, once your cashew queso is blended, the rest is just spreading and sprinkling. We’re talking under 20 minutes for assembly before chilling. If you need Easy Vegan Appetizers for a Crowd that look gourmet but take zero sweat, this is it. I usually make the queso earlier in the day, and then it’s just a 10-minute layering job before guests arrive!
Gathering Ingredients for Your Layered Dip with Cashew Cheese
Alright, let’s get down to brass tacks! When you’re building the Best Vegan 7 Layer Dip Recipe, you need the right tools for the job. Remember, every single element here needs to be plant-based. It’s so easy to grab the wrong refried beans or sour cream, so double-check those labels, my chefs!
Ingredients for the Homemade Cashew Queso Dip Recipe
This is the star, so get your queso ingredients ready. You absolutely must use raw cashews—no roasting allowed! They need a good soak so they blend beautifully smooth. Don’t forget the nutritional yeast; that’s what gives the queso its cheesy punch. And yes, grab a can of vegan refried beans; check the ingredients to make sure they left the lard out!
- 1 cup raw cashews (soaked—we’ll talk about soaking later!)
- 1/2 cup water (just for blending the queso)
- 2 tablespoons nutritional yeast
- 1 teaspoon lemon juice
- 1/2 teaspoon salt
- 1/4 teaspoon garlic powder
- 1 (15 ounce) can vegan refried beans
Components for the Remaining Layers
The rest of the stack is straightforward, fresh produce and simple swaps. Make sure your vegan sour cream is the thick, scoopable kind, not the runny carton variety. We want our layers to stay separate and proud!
- 1 cup vegan sour cream substitute
- 1 cup salsa (I like medium heat)
- 1 cup chopped tomatoes (fresh is best!)
- 1/2 cup sliced black olives
- 1/4 cup chopped fresh cilantro
- 1/4 cup chopped green onions
Mastering the Homemade Cashew Queso Dip Recipe
Okay, real talk time. If you want a truly impressive Layered Dip with Cashew Cheese, the cashew queso has to be perfect. It’s the core flavor building block, so don’t rush this part! We aren’t just making sauce; we’re making the backbone of our dip. You want it unbelievably velvety smooth—no gritty bits allowed!
Once your cashews are drained, toss them into your high-speed blender with that small amount of water, the nutritional yeast for cheesiness, the lemon juice for that little tang, and your spices. Blend it on high, and I mean *high*. You need to keep scraping down the sides until you can’t even see the individual pieces anymore. If it’s struggling, add water one teaspoon at a time until the machine moves freely. That’s the secret to amazing texture!
Soaking Cashews for Ultimate Creaminess
Listen to me: always start with soaked cashews. The recipe calls for a quick 30-minute soak in very hot water, which usually works great for my Vitamix. But if you’re using a standard blender or just forgot to prep, don’t panic! Let them sit in hot water for at least an hour, or even overnight in cold water. Better soaking equals better blending, which means better queso. If you want to read up on some other cashew cream tricks for future baking, check out my contact page resources—it’s all related to getting that perfect emulsion!
Assembling Your Vegan 7-Layer Dip with Cashew Queso: Step-by-Step Assembly
Now that the queso is velvety smooth and the beans are ready, it’s time for the fun part: stacking! Building a great dip like this means treating each layer with respect—we don’t want them bleeding into each other, right? Grab your 9×13 inch serving dish; that size gives us the perfect surface area for seven distinct layers in this Vegan 7-Layer Dip with Cashew Queso.
Laying the Foundation: Beans and Vegan Sour Cream
First up, the base! Spread that can of vegan refried beans evenly across the bottom of your dish. Press it down gently with the back of a spoon to create a firm foundation. Next, take your vegan sour cream substitute and spread that right on top. Again, aim for an even coat. If your sour cream is really cold, let it sit out for five minutes first; it spreads so much nicer when it’s just slightly softened.
Applying the Cashew Queso and Salsa Layers
This is where we get truly decadent! Carefully pour that beautiful homemade cashew queso right over the sour cream. Use a spatula to coax it into covering the white layer completely, but be gentle—you don’t want to drag the sour cream layer up into the queso! Once the queso is down, spoon your salsa on top. This is crucial: spread the salsa very slowly from the center outwards so you don’t disturb that gorgeous, bright orange cashew layer underneath. A little patience here pays off big time visually.
Final Toppings and Setting Time
Finally, we add the fresh produce! Sprinkle your chopped tomatoes, then the black olives, followed by the fresh cilantro and green onions. They look so pretty contrasting against the red salsa. Before you set this out for your guests, though, cover it loosely with plastic wrap and pop it in the fridge for at least 30 minutes. This resting time helps everything firm up just a bit so the layers really stay put when people start digging in. If you need to reach out with questions while layering, feel free to hit up my contact page!
Tips for Success When Making This Crowd Pleasing Vegan Potluck Food
I’ve made this Dairy Free Party Dip Recipes centerpiece dozens of times for massive crowds, and I have a few little tricks up my sleeve to make sure your layers look just as pristine as mine do when they leave the kitchen. Presentation is half the battle with layered dips, isn’t it?
My biggest tip revolves around temperature. Make sure everything that goes on *before* the cold toppings is room temperature or cool. If your salsa is piping hot from the jar, it will melt the sour cream layer beneath it! We want clean lines, not muddy transitions. Remember, a little patience during the assembly process means you get that impressive look when people first see your incredible Vegan 7-Layer Dip with Cashew Queso.
Ingredient Quality for the Refried Bean Dip Layer Recipe
Seriously, don’t overlook the beans! This is the glue for the whole operation, and if you grab the wrong can, you might ruin the whole batch. You absolutely must check the ingredients list on your refried beans. So many standard brands sneak in lard—that’s animal fat that will totally derail your plant-based vision! Read carefully; look for brands specifically labeled vegan or check for zero animal products listed. A smooth, quality refried bean layer sets up nicely and keeps the sour cream from seeping into the bottom layer too quickly.
Make Ahead Vegan Dip Recipes for Stress-Free Entertaining with Vegan Dips
I always tell people that the key to surviving a party is prepping ahead of time, and this dip is perfect for that! When you’re making a complex dish like this one, you don’t want to be blending cashews while guests are ringing the doorbell. Good news: this fits perfectly into my philosophy for Make Ahead Vegan Dip Recipes!
You can actually break this down over two days if you want. The cashew queso is the first thing you should tackle. I usually make a big batch of the Homemade Cashew Queso Dip Recipe—maybe double what the recipe asks for—and store the extra in a sealed container in the fridge. It stays perfectly creamy for at least two days, which is fantastic for busy weeks.
Now, for the full assembly, the recipe notes gave us a great guideline. You can assemble all seven layers, but here is the crucial point for all Entertaining with Vegan Dips: *Leave the fresh stuff off*! If you put the tomatoes, cilantro, and green onions on too early, they get soggy and weep juice, which really ruins the pretty color contrast we worked so hard to achieve.
So, here’s my perfect timeline:
- Day 1: Soak cashews and blend your queso. Store the extra queso. Assemble the first four layers—beans, sour cream, the queso you need for the dip, and the salsa. Cover that tightly with plastic wrap, pressing the wrap right down onto the salsa layer to minimize air exposure. Keep it chilling.
- Day of the Party: About an hour before guests arrive, pull the partially assembled dip out. Add your chopped tomatoes, your olives, and finally, your fresh, bright cilantro and green onions right on top. It looks like you just made the whole thing, but you saved yourself an hour of standing over a blender!
Serving Suggestions for Your Impressive Vegan Appetizer Spreads
Honestly, once this beauty is assembled, the only thing left to do is decide what vehicle you’re going to use to get all that layered deliciousness into your mouth! We want crunch, we want sturdy scoopers, and we definitely want variety so everyone finds something they love.
Tortilla chips are the classic choice, obviously. I always reach for sturdy, restaurant-style triangles because this dip is thick, especially with that refried bean base and the rich cashew queso. You need something that won’t snap halfway!
But don’t stop at chips! For some healthier options, I love setting out big colorful platters of dipping veggies. Think crisp bell pepper strips in every color—red, yellow, orange—along with carrot sticks and maybe even some celery if you’re feeling traditional. Cucumbers are surprisingly great for scooping up the salsa and veggie layers.
- Thick, sturdy tortilla chips (sea salt lightly preferred)
- Crisp bell pepper strips (for color!)
- Freshly sliced cucumbers or jicama sticks
- Toasted pita wedges or triangles
- Maybe some robust pretzel crisps if you need extra crunch
No matter what you pair it with, just make sure you have plenty available because once people see this vibrant tower, spoons will be flying!
Storage and Reheating Instructions for Leftover Vegan 7-Layer Dip with Cashew Queso
Oh, leftovers! If you actually manage to have any of this glorious Vegan 7-Layer Dip with Cashew Queso left over, good on you because that means you weren’t sharing enough!
Storing this dip correctly is really important, mainly because we have those fresh toppings that can go downhill fast. If you followed my advice from the previous section, you left the tomatoes, cilantro, and green onions off until serving time. If you didn’t, you might need to gently scoop the top layer off before storing the rest.
Cover the dish tightly with plastic wrap. You need to press that wrap right down onto the salsa layer—air is the enemy of salsa and sour cream substitutes! Keep it in the fridge. Because there’s no dairy or meat, this dip holds up surprisingly well. If you left off the fresh garnishes, it should last a solid three to four days.
Now, what happens if the dip looks a little sad after a day or two? The layers might firm up when chilled, especially the refried beans and the cashew queso part. If you want to serve it but it feels too stiff, just let it sit on the counter for about 20 minutes before serving. Never try to heat this dip up; it’s designed to be served cold, and heating up salsa and sour cream just doesn’t end well for anyone!
If you want to revive the cashew queso specifically, remember I told you that you can make extra? Take a spoonful of that reserved queso out of its container and mix it into the dip layer that looks the driest. That small addition of fresh, creamy queso usually perks up the whole texture immediately. It’s such a lifesaver for bringing back that amazing creaminess we worked so hard to achieve when making the original recipe!
Frequently Asked Questions About This Plant Based Nacho Dip Tutorial
I know you have questions! When you dive into a recipe this colorful and layered, there are always a few snags people run into, or maybe you just need to make a quick swap on the fly. Don’t stress about it; that’s what this FAQ is for! We’re covering everything from allergies to making sure this Plant Based Nacho Dip Tutorial works for your schedule.
Can I substitute the cashews in the Vegan 7-Layer Dip with Cashew Queso?
That’s a super important question, especially if you’re serving anyone with a nut allergy. The cashew queso gives us that amazing richness, but yes, you absolutely can swap them out! If you need a nut-free version of this dip, I’d suggest two things:
- Use sunflower seeds instead of cashews. You’ll need to soak them just as long—maybe even longer in cold water—for blending. Be warned, the flavor will be distinctly seed-y, not quite the same rich flavor as the cashew cream.
- Use a store-bought, high-quality vegan cheese sauce. If you go this route, you skip the blending step entirely, which is a time-saver, but you lose that homemade, whole-food quality.
You need something thick for the queso layer to keep its integrity, so whatever you choose, make sure it blends or pours thickly!
What is the best vegan sour cream substitute to use?
Choosing the right vegan sour cream is critical for keeping those layers looking sharp. If you use a very thin, almost liquid substitute, it will quickly blend downwards into the refried beans, and you’ll end up with a more marbled dip than a layered one. I look for vegan sour creams that are sold in tubs, not squeeze bottles, and are specifically marketed as thick or full-fat.
Tofutti often works well, or Kite Hill if you can find it. If you find yours is a little runny, try stirring in a teaspoon of cornstarch or letting it sit in a fine-mesh sieve over a bowl for about 15 minutes to drain off any excess moisture before layering. This little move helps keep your second layer nice and defined!
How long does the dip last in the refrigerator?
Since this is packed with fresh veggies and no funky preservatives, we want to eat it while it’s bright! If you assemble the whole thing, toppings and all, I’d say aim to eat it within 24 hours. The salsa and tomatoes will start releasing liquid, which can make the lower layers a bit soft.
However, if you follow my prep-ahead method and save the fresh toppings for the last minute (as detailed in the Make Ahead Vegan Dip Recipes section), you can easily keep the base layers ready for up to three days. The cashew queso layer holds up beautifully, but fresh cilantro browns fast, so keep that greenery separate until serving time!
Estimated Nutritional Data for This Dairy Free Party Dip Recipes
I always get asked about the nutrition, especially with so many rich ingredients like cashews and refried beans involved! Remember, this is a party powerhouse, meant to be eaten in dollops with chips, so everything is estimated here based on a standard 1/10th serving size. Treat this as a nice guide, not strict medical advice, as ingredient choices (like whether you use low-sodium beans or not) will change the final count. You can see the full breakdown below:
- Serving Size: 1/10 of dip
- Calories: Approximately 180
- Fat: Around 12g (Note the high unsaturated fat content from the cashews!)
- Carbohydrates: About 15g
- Protein: 5g
- Sodium: 350mg (This is the one to watch—always check your salsa and bean cans!)
It’s high in healthy fats from the nuts, but surprisingly low in sugar for a party dip! If you want to check out my guidelines on measuring nutritional info for homemade dishes, check out my official disclaimer page.
Share Your Game Day Dips Experience
Okay, that’s everything you need to know to create the most talked-about dish at your next gathering! Now it’s your turn. I truly believe this Vegan 7-Layer Dip with Cashew Queso is going to change your party game forever, so please let me know what you think.
Did you manage to keep those layers perfect? Did the cashew queso earn you bragging rights? Drop a star rating below and leave a comment telling me your favorite part—was it the tangy queso or the fresh veggies on top? I love seeing your beautiful creations, so snap a picture and tag me on social media! Happy dipping, friends!
Estimated Nutritional Data for This Dairy Free Party Dip Recipes
I always get asked about the nutrition, especially with so many rich ingredients like cashews and refried beans involved! Remember, this is a party powerhouse, meant to be eaten in dollops with chips, so everything is estimated here based on a standard 1/10th serving size. Treat this as a nice guide, not strict medical advice, as ingredient choices (like whether you use low-sodium beans or not) will change the final count. You can see the full breakdown below:
- Serving Size: 1/10 of dip
- Calories: Approximately 180
- Fat: Around 12g (Note the high unsaturated fat content from the cashews!)
- Carbohydrates: About 15g
- Protein: 5g
- Sodium: 350mg (This is the one to watch—always check your salsa and bean cans!)
It’s high in healthy fats from the nuts, but surprisingly low in sugar for a party dip! If you want to check out my guidelines on measuring nutritional info for homemade dishes, check out my official disclaimer page.
Share Your Game Day Vegan Dips Experience
Okay, that’s everything you need to know to create the most talked-about dish at your next gathering! Now it’s your turn. I truly believe this Vegan 7-Layer Dip with Cashew Queso is going to change your party game forever, so please let me know what you think.
Did you manage to keep those layers perfect? Did the cashew queso earn you bragging rights? Drop a star rating below and leave a comment telling me your favorite part—was it the tangy queso or the fresh veggies on top? I love seeing your beautiful creations, so snap a picture and tag me on social media! Happy dipping, friends!
PrintVegan 7-Layer Dip with Cashew Queso
Make this impressive, dairy-free 7-layer dip featuring a rich, homemade cashew queso layer. It is perfect for parties and gatherings.
- Prep Time: 20 min
- Cook Time: 0 min
- Total Time: 20 min
- Yield: 10 servings
- Category: Appetizer
- Method: Assembly
- Cuisine: American
- Diet: Vegan
Ingredients
- 1 cup raw cashews, soaked in hot water for 30 minutes
- 1/2 cup water (for queso)
- 2 tablespoons nutritional yeast
- 1 teaspoon lemon juice
- 1/2 teaspoon salt
- 1/4 teaspoon garlic powder
- 1 (15 ounce) can refried beans (ensure vegan)
- 1 cup vegan sour cream substitute
- 1 cup salsa (medium heat)
- 1 cup chopped tomatoes
- 1/2 cup sliced black olives
- 1/4 cup chopped fresh cilantro
- 1/4 cup chopped green onions
Instructions
- Prepare the Cashew Queso: Drain the soaked cashews. Blend the drained cashews, 1/2 cup water, nutritional yeast, lemon juice, salt, and garlic powder in a high-speed blender until completely smooth and creamy. Set aside.
- Prepare the Base: Spread the vegan refried beans evenly across the bottom of a 9×13 inch serving dish or pie plate.
- Layer 2: Gently spread the vegan sour cream substitute over the bean layer.
- Layer 3: Pour the prepared cashew queso evenly over the sour cream layer.
- Layer 4: Spoon the salsa over the queso layer, spreading carefully to avoid mixing layers.
- Layer 5: Sprinkle the chopped tomatoes evenly over the salsa.
- Layer 6: Distribute the sliced black olives over the tomatoes.
- Layer 7: Garnish the top with chopped fresh cilantro and chopped green onions.
- Chill the dip for at least 30 minutes before serving to allow the layers to set.
Notes
- Serve this dip with tortilla chips, vegetable sticks, or pita bread.
- You can make the cashew queso up to two days ahead and store it in the refrigerator.
- For a make-ahead option, assemble all layers except the fresh toppings (tomatoes, cilantro, green onions). Cover tightly and refrigerate for up to 24 hours. Add fresh toppings just before serving.
- If you do not have a high-speed blender for the queso, soak the cashews longer (2-4 hours in cold water) for a smoother result.
Nutrition
- Serving Size: 1/10 of dip
- Calories: 180
- Sugar: 3
- Sodium: 350
- Fat: 12
- Saturated Fat: 2
- Unsaturated Fat: 10
- Trans Fat: 0
- Carbohydrates: 15
- Fiber: 4
- Protein: 5
- Cholesterol: 0