

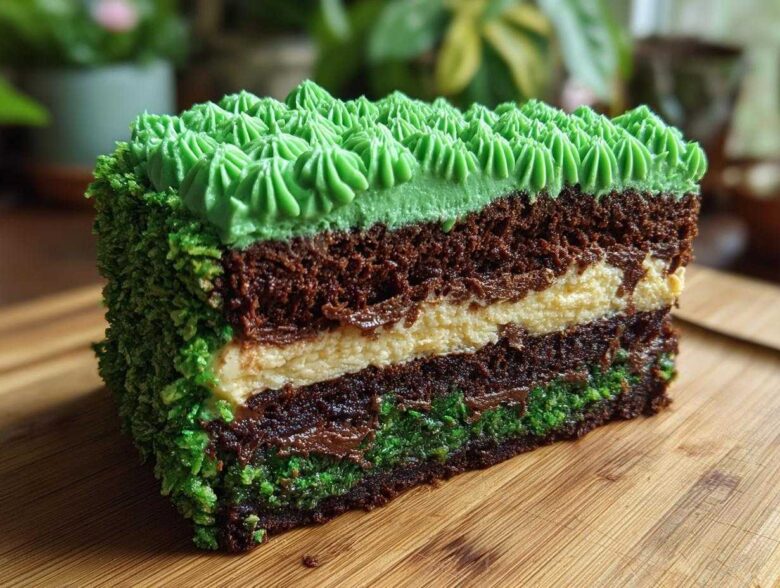
Oh my gosh, if you think baking has to be purely about subtle flavors or fancy plating, you haven’t lived until you’ve made a showstopper! I remember the first time I decided to attempt something truly visual—I was terrified, honestly. But trust me, when you pull this absolutely incredible Fudge Brownie Field Cake with Grass Frosting out of the kitchen, everyone gasps. It takes that decadence you love in a super fudgy layer and turns it into something fun for birthdays or even just a sunny spring afternoon.
I learned so much just trying to get the structure right that first time; check out my baking journey if you want to see some of my early oopsies! You get the rich, dense chewiness from the brownie foundation, which is heavenly, topped with a lovely chocolate cake layer, and then the real fun starts with the green buttercream—it looks complicated, but it’s not once you know the trick.
If you are looking for a centerpiece dessert that tastes as amazing as it looks, this is it. You absolutely have to try making it!
Why You Will Love This Fudge Brownie Field Cake with Grass Frosting
Honestly, sometimes you just need a dessert that makes people happy just by looking at it, right? This cake delivers that punch of fun and flavor all in one go. It’s the perfect unexpected combination, and I promise it’s way easier than it looks!
- You get two incredible textures working together: the dense, super fudgy brownie bottom layer combined with soft, light chocolate cake on top. That textural contrast is everything!
- It’s a brilliant showstopper for any gathering, whether it’s a St. Patrick’s Day celebration, a little league party, or just when you want an edible green pasture on your table.
- The structure is surprisingly sturdy, which makes it great for transporting—no worries about delicate layers collapsing!
- The grass piping technique is addictive! Once you get the hang of it, you’ll want to put grass frosting on everything.
- This Fudge Brownie Field Cake with Grass Frosting is truly customizable; you can swap the cake mix if you prefer to bake from scratch, though the mix saves so much time.
- It tastes rich and decadent, but the simple buttercream keeps it from feeling too heavy overall.
Essential Components for Your Fudge Brownie Field Cake with Grass Frosting
Okay, to make this showstopper work, we aren’t just making one thing; we are building layers, which is what makes the Fudge Brownie Field Cake with Grass Frosting so special! You’ve got three main components that need your attention: the super rich brownie base, the light chocolate cake layers that build the height, and the buttercream that gets transformed into beautiful green grass. Don’t panic about the three parts; they are all surprisingly simple to prep!
Ingredients for the Decadent Fudge Brownie Base
This is the fudgy anchor of the whole dessert, so we need good quality ingredients here. For the brownie itself, make sure you have these items ready:
- 1 cup (2 sticks) unsalted butter, melted
- 2 cups granulated sugar
- 4 large eggs
- 1 teaspoon vanilla extract
- 1 cup all-purpose flour
- 3/4 cup unsweetened cocoa powder
- 1/2 teaspoon salt
- 1/2 cup semi-sweet chocolate chips (the meltier, the better!)
Ingredients for the Chocolate Cake Layers
Because we are already making one layer rich and fudgy, I suggest using a good quality box mix for the cake layers—it cuts down on time without sacrificing that necessary height. You’ll need one standard box (about 15.25 oz) of chocolate cake mix, plus whatever the box calls for, which usually includes:
- Eggs (likely 3)
- Oil
- Water or milk
Ingredients for the Easy Grass Frosting Technique
This is where we get colorful! For the grass, you need a sturdy buttercream that will hold those little grass spikes up. Make sure your butter is perfectly softened—not melted!
- 1 cup (2 sticks) unsalted butter, softened
- 4 cups powdered sugar, sifted (sifting prevents lumps, trust me!)
- 1 teaspoon vanilla extract
- 1/4 cup milk or heavy cream
- Green food coloring (gel preferred—it gives you brighter color without thinning out the frosting!)
Step-by-Step Instructions for the Fudge Brownie Field Cake with Grass Frosting
Alright, let’s get baking! This is where all your prep work really pays off. We are tackling this in manageable chunks: getting that amazing brownie baked, prepping the cake layers, making the frosting army, and then putting it all together so we can get to the fun decorating part. Keep things organized and remember that cooling is your best friend during assembly—it prevents a mushy mess!
Baking the Rich Fudge Brownie Dessert
First things first, let’s get the base cooked. Preheating your oven to 350°F (175°C) is step one. Get a 9×13 inch pan ready by greasing it and lining it with parchment paper, making sure you leave an overhang on the sides. This overhang is crucial for lifting the finished brownie out later!
Whisk together your melted butter and sugar in a big bowl until they look like they are starting to marry. Whisk in those four eggs one by one, followed by your vanilla. In a separate bowl, whisk the flour, cocoa, and salt really well—no one wants streaks of dry cocoa powder in their fudgy treat!
Gradually add the dry stuff to your wet ingredients. Mix it just until you stop seeing flour streaks; remember, no overmixing! Fold in those semi-sweet chocolate chips. Spread that batter evenly and bake it for about 25 to 30 minutes. Here’s the tip: when you test it, you want a toothpick to come out with moist crumbs clinging to it, not totally dry. That’s the secret to fudge!
Preparing and Cooling the Cake Layers
Now for the cake part! Follow whatever your box of chocolate cake mix tells you to do—I use the exact measurements listed for the oil, eggs, and water, because why mess with success when you’re aiming for height?
Pour the batter into two greased 8-inch round cake pans. Bake those according to the package directions. Once they are done, let them cool in the pans for about 10 minutes before gently turning them out onto a wire rack to cool completely. They must be 100% cool before we move on to assembly. Seriously, give them time!
Crafting the Best Buttercream for Piping Grass
Time to make the foundation for our grassy field! Beat your softened butter until it’s light and creamy—this takes a minute or two with the mixer. Now, start adding the sifted powdered sugar slowly, alternating with your milk or cream. Once it’s all incorporated, crank the mixer up and beat it until it’s fluffy, then mix in that vanilla.
Now, this is important: divide your frosting. Keep just a small amount white or a very, very pale green for the ‘undercoat.’ Tint the rest—the majority of it—a vibrant, happy green color using that good gel coloring. Gel is super important so you don’t end up with soupy frosting! You want that vibrant green to be thick enough so it doesn’t immediately flop over.
Assembling Your Unique Brownie Cake Combos
This layering technique is what gives the Fudge Brownie Field Cake with Grass Frosting its signature weight and contrast. First, carefully lift your cooled brownies out using the parchment overhang. If they are a different shape than your 8-inch cakes, trim them slightly so they match up nicely.
Place your first cake layer down on your serving plate. Spread a thin layer of that light-colored/plain frosting over it. Next, carefully place your cooled brownie layer right on top! Then, another thin layer of the light frosting goes over the brownie. Finally, top it all off with your second cake layer.
Grab a tiny bit of that light frosting and do a quick, messy crumb coat all over the entire exterior of the stacked cake. This seals in any loose crumbs so they don’t ruin your beautiful grass! Pop the whole thing in the fridge for about 15 minutes to firm up that coat. This makes piping so much easier!
Mastering the How to Pipe Grass Frosting Technique
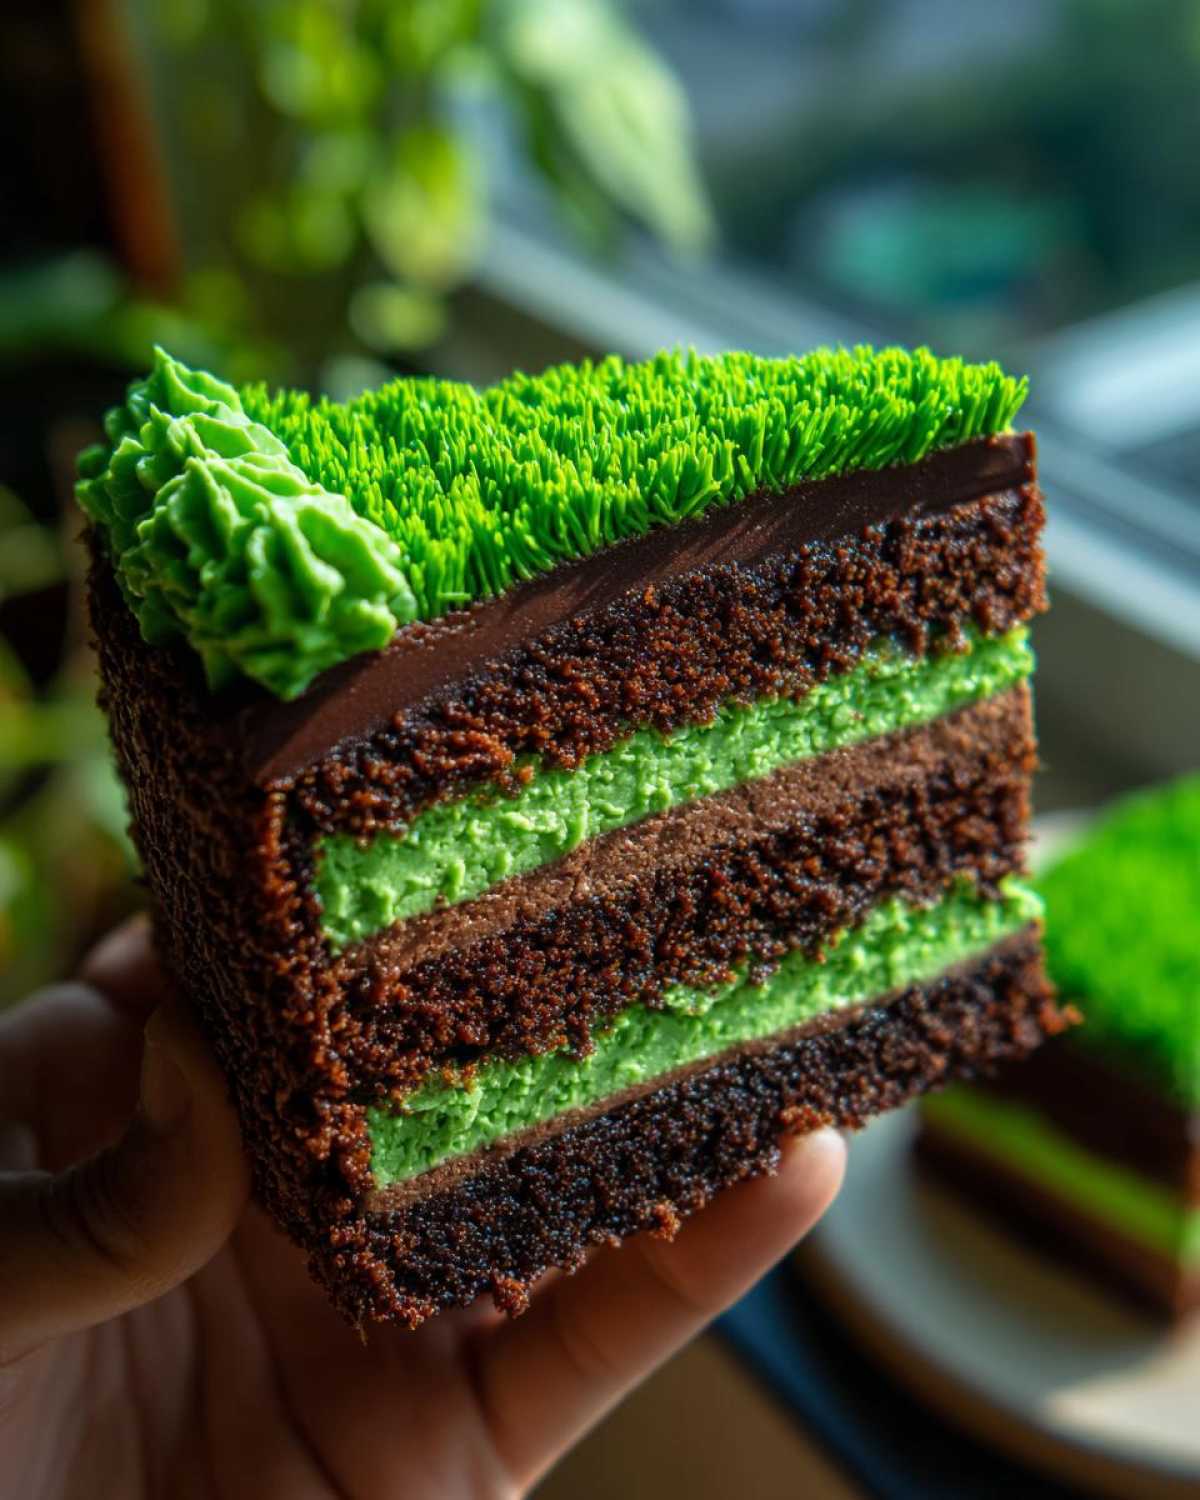
This is the best part! Load up a piping bag with that bright green frosting and fit it with a multi-opening tip, like the Wilton #233 grass tip—that’s the magic tool you need here.
Hold the bag perpendicular to the cake. You want to pipe short, quick little pulls. Don’t swirl or drag! Just gently squeeze, pull up slightly as you release the pressure, and stop. Repeat this process covering the top and the sides until you can no longer see the cake underneath. You want overlapping strokes for a really dense, lush look, making your finished creation look like a perfect Edible Green Pasture Cake!
Tips for Success with Your Field Cake Decorating Tutorials
Listen, even professional bakers have little hiccups sometimes, especially when dealing with temperature contrasts like we are here with a cold cake and room-temperature frosting. But I’ve learned a few tricks over the years that make getting that perfect grassy look so much smoother. These little details are the difference between a droopy field and a perfectly lush, green landscape!
First off, chill time is your best friend when decorating any tiered assembly. You chilled your crumb-coated cake for 15 minutes, right? Great! Before you start piping the grass, stick that bright green frosting into the fridge for maybe 10 minutes too. If the frosting gets too warm while you are piping, it gets soft and lazy, and those grass strands won’t stand up crisply. You want it firm, but still soft enough to move easily through the tip.
When you are actually piping, remember that little tugging motion is everything. You aren’t drawing lines; you are trying to force short bits of frosting out that multi-hole tip. Pressure on, a quick pull up, and then release completely before moving to the next spot. If you try to move the tip while still piping, the strands will smear together instead of looking like individual blades.
Also, pay attention to the brownie layer when you are assembling. If your brownie baked up a little thin or cracked, don’t worry! That’s why we use that thin layer of light-colored frosting over it before stacking again. This acts like a buffer zone, ensuring the structure is even before the final green layer goes on—nobody will ever know the brownie was slightly shy!
Storage and Reheating Instructions for the Fudge Brownie Field Cake
So, you’ve made this gorgeous, show-stopping Fudge Brownie Field Cake with Grass Frosting! Now we need to make sure it looks amazing when it’s time to serve it, which means proper storage. Because we are using all that delicious buttercream frosting, refrigeration is definitely your best friend here, especially if you’ve made it ahead of time.
When you aren’t actively showing off the cake, cover it loosely. You don’t want to press plastic wrap directly onto the grass frosting unless you absolutely have to, or you’ll flatten all your hard piping work! Using a cake dome or placing it in an airtight container that’s tall enough to clear the frosting is the safest bet. It will keep beautifully in the fridge for about three days.
But here is the critical, make-or-break tip for texture—never serve this cake ice-cold right out of the fridge! That beautiful, dense brownie layer and the buttercream both get hard when they are chilly, and nobody wants to chip a tooth on chilly fudge. Take the cake out about an hour, maybe an hour and a half, before you plan on cutting into it. Letting it sit on the counter allows the butter in the frosting to soften up just right and brings the brownie back to that perfect, chewy, room-temperature fudge state. You’ll notice the difference immediately when you slice it!
Frequently Asked Questions About This Brownie Cake
I get so many messages asking about tweaks and shortcuts for specialty cakes like this! It’s funny how often people worry about the brownie mixing with the cake, or they ask about what piping tip to use. Let’s clear up some of the most common things I hear about the Fudge Brownie Field Cake with Grass Frosting.
Can I make the brownie layer ahead of time for this Fudge Brownie Layer Cake Recipe?
Oh yes, absolutely! In fact, I recommend it! When you are making a multi-component dessert like this, prepping pieces ahead of time saves your sanity. You can totally bake the brownie layer a day or even two days before you assemble everything. Just make sure it’s cooled completely, then wrap it tightly—I mean really tight, maybe in plastic wrap and then foil—and keep it at cool room temperature if you’re using it the next day, or in the fridge if it’s later. Keeping it wrapped stops it from drying out before you get to use it in your Fudge Brownie Layer Cake Recipe.
What is the best type of green coloring for the grass frosting?
If you want that super vibrant, almost electric green that really mimics fresh turf, you have to use gel food coloring, hands down. If you try to use the regular liquid drops you find in the supermarket baking aisle, you’re going to need so much of it to get the color intense enough that you end up adding way too much liquid to your perfectly balanced buttercream. That extra liquid thins the frosting right out, and suddenly those beautiful grass tips you’re trying to pipe just collapse into sad, gooey puddles everywhere. Stick to gel or paste colors for rich coloring without affecting the texture!
Are there simple Themed Birthday Cake Ideas using this base?
Yes! Once you master the technique for the Easy Grass Frosting Technique, you can swap out themes so easily. Since the base is a sturdy brownie and cake combo, it holds toppers really well. For simple Themed Birthday Cake Ideas, try this: If you’re doing a sports pitch, use a little white frosting to pipe hash marks or goal lines on top of the grass. For a garden party cake, try using edible flowers or little fondant mushrooms nestled into the green frosting instead of just grass everywhere. You can even pipe little brown mounds if you wanted to mimic molehills! The look works for any spring dessert recipes brownie fans would love.
If you have any other burning questions about ratios or assembly, feel free to reach out to me through my contact page!
Nutritional Information Disclaimer
Look, I absolutely love that you’re diving into the baking details, but I have to put a little friendly disclaimer here about the numbers. Since I’m sharing this recipe because it tastes amazing and brings joy, the nutrition breakdown is purely an estimate based on the ingredients listed and standard brand calculations.
What I mean is, if you use a special brand of high-fat cocoa powder or decide to generously pipe your **Fudge Brownie Field Cake with Grass Frosting** with extra thick layers of buttercream, those numbers are going to change! Everyone bakes slightly differently, and that’s okay and part of the fun! Please use these figures—like calories, sugar, and fat—as a general guide only. For strict dietary tracking, you’ll want to run the specific ingredients you ended up using through your own trusted calculator.
For more details on how I handle information here on the site, you can always check out my official disclaimer page. Happy baking!
Share Your Field Cake Creations
Now that you’ve read through all the specifics—from achieving that perfect fudgy brownie base to mastering the tricky little ‘pull’ motion for the grass piping—I just can’t wait for you to try this cake!
When you do bake your own Fudge Brownie Field Cake with Grass Frosting, please, please come back here and let me know how it turned out! Did the green come out vibrant? Did your family try to guess what kind of cake it was before you told them? Leave a comment below telling me all about it!
And if you take pictures—and I really, really hope you do because I live for this stuff—tag me on social media! I absolutely love seeing your versions of my recipes pop up in my feed. Seeing your beautiful, edible green pastures really makes my day. A five-star rating right below here tells other bakers that this recipe is a winner, too, so don’t forget that step. Happy decorating, friends!
PrintFudge Brownie Field Cake with Grass Frosting
A recipe for a rich fudge brownie base topped with a layer cake and decorated with green buttercream piped to look like grass.
- Prep Time: 45 min
- Cook Time: 40 min
- Total Time: 85 min
- Yield: 12 servings
- Category: Dessert
- Method: Baking and Assembly
- Cuisine: American
- Diet: Vegetarian
Ingredients
- 1 cup (2 sticks) unsalted butter, melted
- 2 cups granulated sugar
- 4 large eggs
- 1 teaspoon vanilla extract
- 1 cup all-purpose flour
- 3/4 cup unsweetened cocoa powder
- 1/2 teaspoon salt
- 1/2 cup semi-sweet chocolate chips
- 1 box (15.25 oz) chocolate cake mix (plus ingredients listed on box for cake layers)
- 1 cup (2 sticks) unsalted butter, softened (for frosting)
- 4 cups powdered sugar, sifted (for frosting)
- 1 teaspoon vanilla extract (for frosting)
- 1/4 cup milk or heavy cream (for frosting)
- Green food coloring (gel preferred)
Instructions
- Prepare the Fudge Brownie Base: Preheat your oven to 350°F (175°C). Grease and line a 9×13 inch baking pan with parchment paper, leaving an overhang.
- In a large bowl, whisk the melted butter and granulated sugar until combined. Whisk in the eggs one at a time, then stir in the vanilla extract.
- In a separate bowl, whisk together the flour, cocoa powder, and salt. Gradually add the dry ingredients to the wet ingredients, mixing until just combined. Fold in the chocolate chips.
- Pour the batter into the prepared pan and spread evenly. Bake for 25 to 30 minutes, or until a toothpick inserted near the center comes out with moist crumbs attached. Cool completely on a wire rack.
- Prepare the Cake Layers: Follow the package directions for the chocolate cake mix, using the specified eggs, oil, and water/milk. Divide the batter evenly between two 8-inch round cake pans. Bake according to package directions. Cool completely.
- Make the Grass Frosting: Beat the softened butter in a large bowl with an electric mixer until creamy. Gradually add the sifted powdered sugar, alternating with the milk, mixing on low speed until incorporated, then beating on medium speed until smooth. Add vanilla extract.
- Divide the frosting into two bowls. Leave one bowl white or tint it a very light green. Tint the second, larger portion of frosting a vibrant green using gel food coloring.
- Assemble the Cake: Once the brownies are cool, carefully remove them from the pan using the parchment overhang. If necessary, trim the brownies to match the size of your cooled cake layers. Place one cake layer on your serving plate or cake board. Spread a thin layer of the light-colored frosting over the top.
- Place the cooled brownie layer on top of the first cake layer. Spread a thin layer of light-colored frosting over the brownies. Place the second cake layer on top. Lightly crumb coat the entire assembled cake (brownie and cakes) with the light-colored frosting and chill for 15 minutes.
- Apply the Grass: Transfer the vibrant green frosting to a piping bag fitted with a multi-opening tip (like a Wilton #233 grass tip). Pipe short, quick strokes all over the sides and top of the chilled cake to create a dense, grassy texture.
- Serve the cake at room temperature.
Notes
- For a denser brownie, reduce the flour by 1/4 cup.
- Chill the green frosting slightly before piping if it becomes too soft to hold its shape.
- You can use a thin layer of chocolate ganache between the brownie and cake layers for extra richness.
Nutrition
- Serving Size: 1 slice
- Calories: 450
- Sugar: 55
- Sodium: 250
- Fat: 25
- Saturated Fat: 15
- Unsaturated Fat: 10
- Trans Fat: 0
- Carbohydrates: 58
- Fiber: 2
- Protein: 5
- Cholesterol: 90