

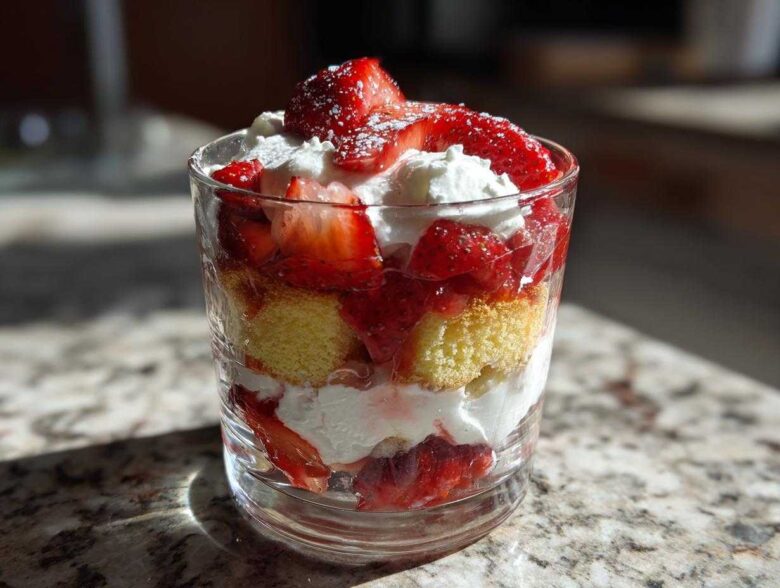
When summer hits, I absolutely cannot resist a dessert that feels both incredibly fancy and deeply comforting at the same time. Forget spending hours fussing over layers of frosting! My absolute favorite way to capture that perfect taste is by turning it into towering, gorgeous Classic Strawberry Shortcake Trifles. Seriously, I perfected this layered version a few years back when I realized my usual shortcake biscuits were getting soggy too fast in the heat, and the trifle presentation just solved everything! For more about my baking philosophy, you can check out my page over at Spoon Swirl Kitchen.
This recipe is the best of both worlds: you get the satisfying texture of real shortcake mixed with juicy, sweet berries and clouds of fresh whipped cream, all stacked up tall in a glass, so you can actually see the beautiful layers when you serve it.
Why You Will Love This Classic Strawberry Shortcake Trifles Recipe
Honestly, why bother with a whole cake when you can make individual desserts that look ten times more impressive with way less stress? This layered approach is fantastic for summer parties because you build it right in the glass, which cuts down on dishwashing later. Plus, the moisture from the macerated strawberries soaks into the cake just perfectly!
Key Benefits of Our Classic Layered Berry Dessert
- It looks elegant but assembly is shockingly fast—it’s basically layering!
- You get that perfect balance: tender cake, tart berries, and rich cream in every single bite.
- We give you the speedy option to grab high-quality sponge cake, so you don’t have to slave over biscuits if you’re short on time.
- It’s portion-controlled, which means no arguments over who gets the biggest slice!
Ingredients for Perfect Classic Strawberry Shortcake Trifles
When it comes to making something look spectacular, you need good building blocks, right? Don’t skimp here! We’re going to break this down into the three essentials: the base (which can be shortcake or sponge), the juicy fruit that gives us all those lovely pink juices, and the cloud of cream on top. Getting these ratios right is what makes this a Strawberry Shortcake Trifle Recipe that knocks socks off! You’ll notice we have separate sugar amounts—that’s important!
For the Homemade Shortcake Base
- 2 cups all-purpose flour
- 1/4 cup granulated sugar (this goes into the dough itself!)
- 1 tablespoon baking powder
- 1/2 teaspoon salt
- 6 tablespoons cold unsalted butter, cut into small pieces (Seriously, keep it cold! That’s our secret to flaky biscuits.)
- 3/4 cup heavy cream or milk
For the Macerated Strawberries
Remember, this fruit mixture is doing double duty: flavoring the berries *and* soaking the cake layer! We listed 2 pounds because you need volume for those layers.
- 2 pounds fresh strawberries, hulled and sliced
- 1/2 cup granulated sugar (This is for drawing out that gorgeous syrup.)
- 1/4 cup lemon juice (optional, but it really brightens everything up!)
For the Best Whipped Cream Trifle Topping
You’ve got to use heavy cream here, dump the aerosol cans! We need real structure for our Layered Cake and Cream Dessert.
- 2 cups heavy whipping cream
- 1/2 cup powdered sugar
- 1 teaspoon vanilla extract
And of course, you’ll need about 1 store-bought or homemade vanilla sponge cake or shortcake biscuits, which we’ll chop up into 1-inch cubes when we start assembling!
Expert Tips for Making the Shortcake Component
If you’re whipping up your own shortcake biscuits—which I totally encourage, because homemade flavor is unbeatable—the trick is speed and keeping things frozen cold. Think of it like making pie crust! Once you’re cutting in that cold butter, you want to work fast so the fat doesn’t melt into the flour. If the butter completely vanishes, you end up with a tough, cracker-like crumb instead of that tender, fluffy biscuit texture we need.
My number one pro tip for achieving that tender crumb, whether you’re using biscuits or a sponge cake substitute, is this: don’t overmix the liquid into the dry ingredients. For biscuits, you literally stop mixing the cream in when you *just* see the last few streaks of flour. That mixing develops gluten, and gluten means chewiness, not tenderness. We want soft, crumbly cubes perfect for soaking up strawberry juice!
Now, if you’re in a massive rush, swapping out the biscuit is totally fine. I often use a light, high-quality vanilla sponge cake from the bakery. Just make sure it’s not *too* soft or airy, because we need some structure to hold up against the cream and those juicy berries in the trifle.
Step-by-Step Instructions for Classic Strawberry Shortcake Trifles Assembly
This is where the magic happens! Even though this is a layered dessert, we need to handle the components correctly before we start stacking them up. We’ve got three main jobs: bake/prep the cake, chill the fruit, and whip the cream. Don’t rush the resting stage for the berries—that’s non-negotiable for the best results in our Classic Strawberry Shortcake Trifles.
Preparing the Cake Cubes and Macerating the Berries
First up, let’s get those shortcakes baked if you’re making them from scratch! Get your oven going at 425°F (220°C). Mix up your dry ingredients, cut in that cold butter until you have coarse crumbs, and then just barely stir in the cream until it comes together. Drop spoonfuls onto a sheet and bake them for about 12 to 15 minutes until they look beautifully golden on top. Let them cool completely, then chop them right up into 1-inch cubes so they’re ready to soak up flavor later.
While those are cooling (or while you buy your favorite sponge cake!), tackle the strawberries. Slice up all two pounds, toss them gently with the 1/2 cup of sugar and the optional lemon juice. Now, this step is critical: let them just sit on the counter for a solid 30 minutes. You’ll see them start weeping sweet, delicious juice. That juice is gold—it’s what transforms your cake cubes from dry crackers into tender, beautiful shortcake layers!
Whipping the Cream for Your Layered Cake and Cream Dessert
You only do this step once everything else is ready, because whipped cream hates waiting around! Grab your mixing bowl—seriously, put it in the freezer for ten minutes beforehand—and toss in your heavy cream, powdered sugar, and vanilla. Don’t mess around; use high speed until you start seeing stiff peaks form. I mean it, as soon as the peaks hold their shape firmly when you lift the whisk, stop! If you keep going, you’ll have butter, and nobody wants clumps of butter in their Layered Cake and Cream Dessert.
Assembling Your Individual Strawberry Trifles
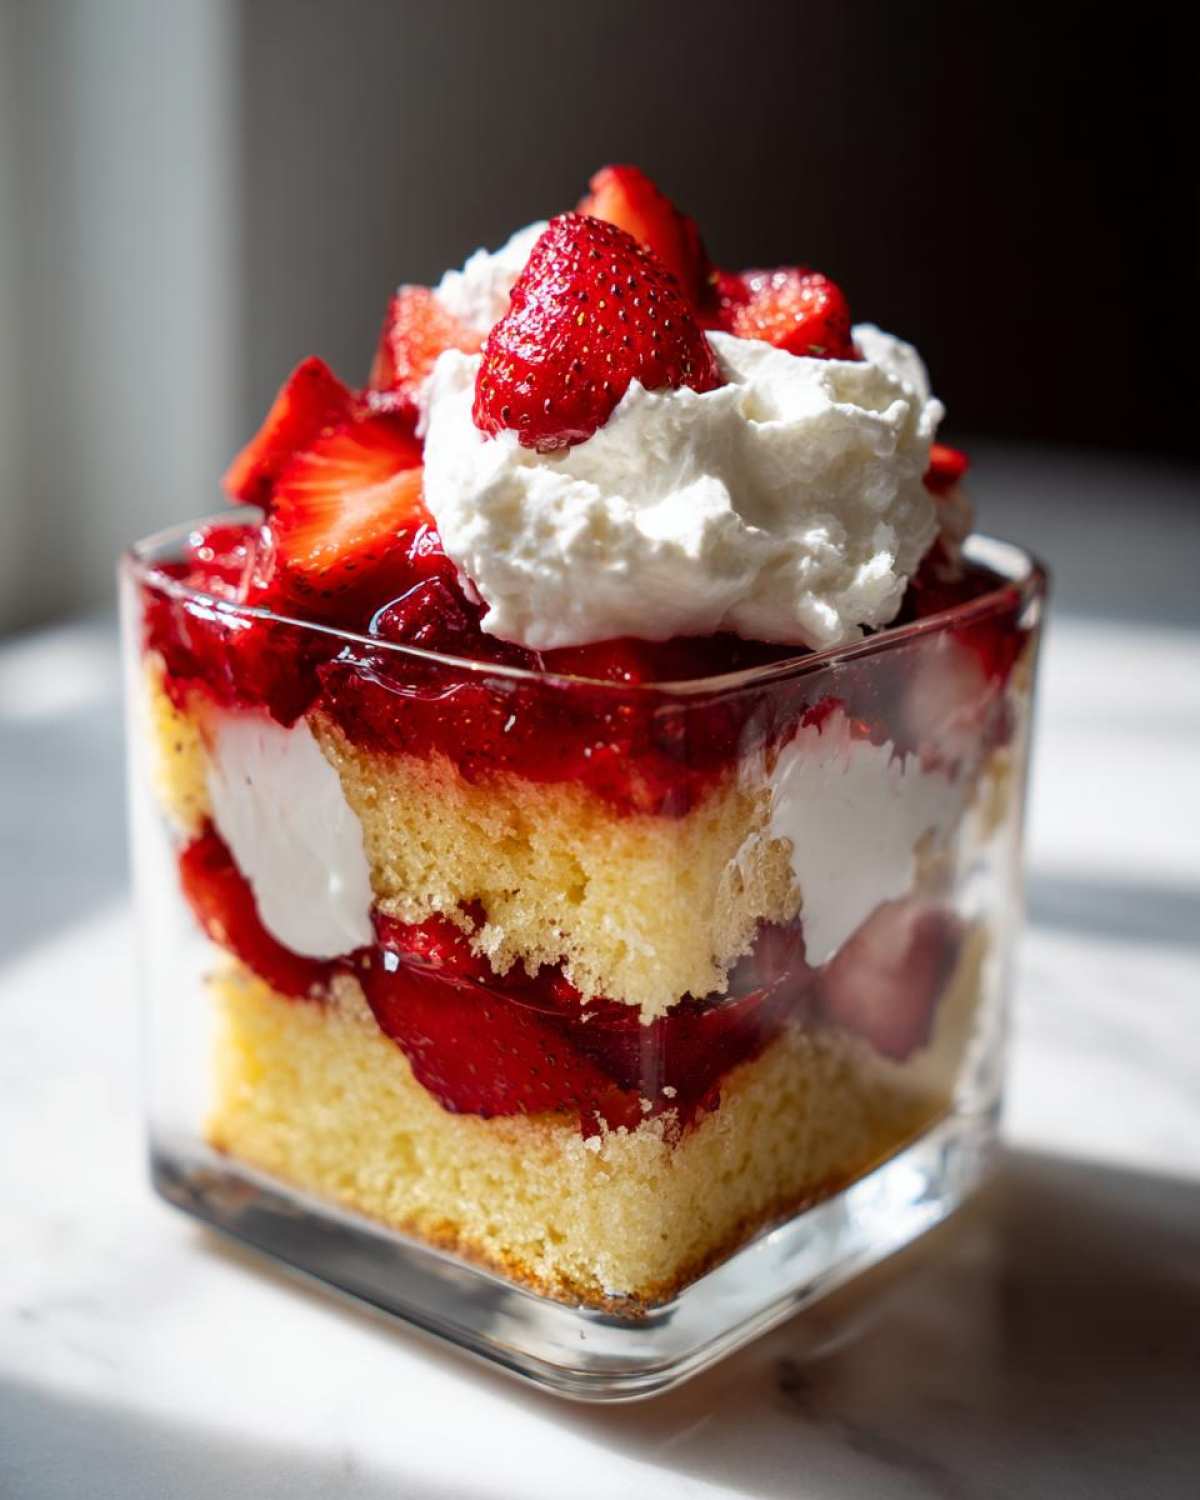
Time to build! Get your clear glasses ready—the individual ones are so much fun to hand out. For the very first layer on the bottom, use a good scoop of your cake or shortcake cubes. Don’t be shy! Next, spoon over some of the macerated strawberries, making sure to drizzle a little bit of that glorious strawberry syrup from the bottom of the berry bowl right over the cake. That’s our moisture secret!
Cap that off with a generous dollop (or maybe two!) of your freshly whipped cream. That’s one perfect layer down. Now, just repeat the pattern: cake, strawberries and juice, and then cream again. Finish the whole thing with a final, glorious swirl of whipped cream right on top. If you do this gently, you’ll have the most stunning Classic Strawberry Shortcake Trifles ready for the fridge!
Ingredient Notes and Substitutions for Your Strawberry Shortcake Trifle Recipe
I always get questions about tweaking recipes, and that’s totally normal! You shouldn’t feel boxed in by ingredients, but with a classic dessert like this, you need to know what happens if you switch things up. We want to maintain that tender, soak-able texture, so paying attention to detail makes all the difference.
For instance, let’s chat about the lemon juice I mentioned in the macerating step. If you skip it? No biggie, your strawberries will just taste a little flatter. But that small bit of acid? It actually wakes up the flavor of the strawberries and that 1/2 cup of sugar. It’s like adding a tiny pinch of salt to cookie dough—it makes everything taste *more* like itself.
Now, the shortcake versus sponge cake debate! If you’re running late or you just don’t have time to bake up my shortcake recipe, you have great options! My go-to substitute is a dense, buttery pound cake. It has enough structure not to crumble instantly when you soak it with berry juice. Angel Food cake is also good if you prefer something lighter, but watch your liquid ratio, as it absorbs moisture faster than biscuits.
Another common question is about the butter in the biscuits. Since we need those fat pieces to create steam pockets for lift, please do not substitute margarine or oil for the cold butter. Margarine often has too much water content, which ruins the texture of a good biscuit, making it greasy instead of tender. Stick with unsalted butter and keep it icy cold—it’s worth the extra minute in the freezer!
Tips for Perfect Make Ahead Strawberry Trifle Texture
Okay, we’ve built the tower, and it looks great, but don’t grab a spoon just yet! The absolute hardest part of making these desserts is practicing patience, especially because we want the soak factor to be just right. The moisture from those sugary strawberries needs time to work its magic on those shortcake cubes.
You absolutely must chill these beauties! If you serve them straight after you layer them, that biscuit layer on the bottom will taste dry and slightly crunchy, and the whipped cream will be too stiff. We need at least one full hour in the fridge. Trust me on this—that hour lets the strawberry syrup seep down and soften the cake just enough, melding all those bright, sweet flavors together. It turns the whole thing from just ‘layered stuff in a cup’ into a sublime Classic Strawberry Shortcake Trifles experience!
This is also why these are fantastic make-ahead desserts! I find you can prepare the components—shortcakes baked, strawberries macerating, and cream whipped—all the way up to four hours before you plan to serve them. Just keep everything covered tightly in the fridge separately.
However, you have to laminate the layers no more than two hours before serving. If you let the trifles sit overnight, that lovely cake layer will turn into mushy pudding from soaking up *too* much juice. We want tender, not soggy! If you want to bookmark some great tips on preventing sticky surfaces on your serving utensils, you should definitely check out my thoughts on handling kitchen surfaces!
When you pull them out after their required chill time, they are firm, cold, and the layers look beautifully defined through the glass. Then you just add your final garnish and serve! Easy peasy!
Serving Suggestions for an Elegant Strawberry Dessert Presentation
Presentation is everything with a dessert like this! Because all the hard work you put into the layers is visible, we want to make sure those glasses look as amazing as the taste is. While I love making these in one big, deep trifle bowl for family picnics—it feels so wonderfully rustic and Southern—I really think the individual cups offer that special, elegant touch for company.
When you use individual glasses, you get perfect scoop distribution every time. No one fights over the corner piece that has the most cream! Just make sure your glasses are clear so everyone can admire the alternating colors of golden-white cake, ruby-red strawberries, and snow-white cream. This is what makes it a highlight among all your Summer Trifle Ideas!
Now for the finishing touches! You want a pop of color right on top of that final swirl of cream. I almost always use a single, perfect, hulled strawberry placed strategically right in the center. A tiny, fresh mint sprig tucked beside it is the ultimate classic move—it adds a beautiful contrast and a hint of freshness that cuts through the sweetness.
If you are using a large trifle dish, make sure your very top layer of cream is smooth enough that you can gently press thin slices of strawberry around the entire top edge. It mimics the look of a full cake top! Either way you go—big bowl or Individual Strawberry Trifles—the key is making sure the garnish is added right before you serve, so the mint stays crisp and the berries look dewy.
Storage and Reheating Instructions for Classic Strawberry Shortcake Trifles
So, you made too much—which, frankly, is my usual problem when I whip up a batch of these! That’s the great thing about Classic Strawberry Shortcake Trifles; they hold up pretty well since the cake soaks up the juices. But because we are using fresh, real whipped cream and fresh berries, we have to be smart about leftovers.
The absolute best way to store any extras is in the refrigerator, covered tightly. I usually use plastic wrap and press it gently over the top layer of cream, or I’ll cover the individual cups with small plastic lids if I have them. This keeps the cream from weeping or absorbing any funky fridge smells. You can definitely keep these leftovers for a day or maybe even up to two days.
Now, I need to be very clear about this next part: do not, under any circumstances, try to freeze these. Freezing is the enemy of a perfect trifle. When that whipped cream thaws out, it separates and turns watery, and the fresh strawberries get this strange, mushy texture. We worked too hard to get those distinct layers, so let’s skip the freezer entirely!
When it comes time to eat the leftovers, you can serve them straight from the fridge. They usually taste even better the next day once those flavors have really had time to marry up—the biscuit layer is perfectly tenderized. If you want them *extra* cold, just make sure they are well-covered and chill them longer. Enjoying your Classic Strawberry Shortcake Trifles the next day is almost as good as the first time!
Frequently Asked Questions About Layered Cake and Cream Dessert
I always get a flood of questions after posting this recipe because everyone wants their **Easy Strawberry Trifle Assembly** to go off without a hitch! It’s funny how many ways people want to adapt this classic, but I’m happy to answer some of the most common queries I get about turning this into the perfect Southern Strawberry Shortcake Dessert.
Can I skip macerating the strawberries?
Technically, yes, you *can* skip it, but wow, why would you want to? The best part of a great trifle build is that moist, almost saucy layer created when the sugar draws the liquid out of the berries. If you use fresh, un-macerated berries, you won’t have that beautiful juice to soak into your cake layer. That soaking step is non-negotiable if you want that signature tenderness in your **Classic Strawberry Shortcake Trifles**—it’s what marries the cake and the fruit together!
What is the best cake substitute for this trifle?
If you’re feeling lazy or you just don’t have time to bake up my shortcake recipe, you have great options! My go-to substitute is a dense, buttery pound cake. It has enough structure not to crumble instantly when you soak it with berry juice. Angel Food cake is also good if you prefer something lighter, but watch your liquid ratio, as it absorbs moisture faster than biscuits.
Another popular swap I hear about involves using store-bought ladyfingers, which is a great trick if you want an incredibly quick assembly. If you’re interested in how I approach recipe sharing and policies, you can always review my guidelines at my terms of service page!
Estimated Nutritional Data for This Summer Trifle Ideas
Now, I always like to put in this disclaimer because you know I’m not a nutritionist, I’m just a cook who loves berries and cream! The numbers I’ve gathered are based on the recipe details—using standard white flour shortcakes and whole heavy cream. So these figures are really just an educated guess to give you an idea of what you’re enjoying.
If you lighten up your whipped cream or skip the sugar in the strawberry maceration, your numbers are going to drop significantly. But hey, we’re making a classic dessert here, right? We want the good stuff! If you want to read about my specific approach to recipe accuracy and disclaimers, feel free to jump over and read my full disclaimer page.
Here’s the ballpark estimate for one of these beautiful individual dessert cups:
- Serving Size: 1 trifle cup
- Calories: 450
- Fat: 28g (Whew! That’s the cream talking.)
- Saturated Fat: 17g
- Carbohydrates: 45g
- Sugar: 35g
- Protein: 5g
- Cholesterol: 95mg
Just remember, these are estimates! They can wildly change based on how heavy-handed you are with the whipped cream topping, which is, let’s be honest, the best part. Enjoy every spoonful!
Share Your Homemade Shortcake Dessert Cups Creations
Alright, that’s the whole process for crafting the most beautiful, delicious Classic Strawberry Shortcake Trifles! Now, the only thing missing is seeing your stunning glass towers!
I truly hope you loved making these as much as I love eating them. Once you’ve tucked them into the fridge and they’ve chilled up just right, I would absolutely love to see how you styled them. Did you go for the mint sprig or stick to just three berries on top?
Please, please, please leave a star rating right below this post. It helps other folks know this recipe is a winner, and I read every single comment you leave!
If you had any hiccups during the layering process or found a substitution that worked like a charm, share that knowledge with the rest of us in the comments section. You can always get in touch with me directly if you have specific questions you don’t want to post publicly; just head over to the contact page. Happy layering, and enjoy every last scoop of that fresh cream!
PrintClassic Strawberry Shortcake Trifles
A recipe for layered desserts combining shortcake biscuits, macerated strawberries, and fresh whipped cream presented in individual trifle cups.
- Prep Time: 30 min
- Cook Time: 15 min
- Total Time: 45 min
- Yield: 6 servings
- Category: Dessert
- Method: Assembly
- Cuisine: American
- Diet: Vegetarian
Ingredients
- 2 cups all-purpose flour
- 1/4 cup granulated sugar plus 1/2 cup for strawberries
- 1 tablespoon baking powder
- 1/2 teaspoon salt
- 6 tablespoons cold unsalted butter, cut into small pieces
- 3/4 cup heavy cream or milk
- 2 pounds fresh strawberries, hulled and sliced
- 1/4 cup lemon juice (optional, for strawberries)
- 2 cups heavy whipping cream
- 1/2 cup powdered sugar
- 1 teaspoon vanilla extract
- 1 store-bought or homemade vanilla sponge cake or shortcake biscuits, cut into 1-inch cubes
Instructions
- Prepare the shortcakes or cake: If using biscuits, mix flour, 1/4 cup sugar, baking powder, and salt. Cut in the cold butter until the mixture resembles coarse crumbs. Stir in the cream until just combined. Drop spoonfuls onto a baking sheet and bake at 425°F (220°C) for 12-15 minutes until golden. Cool completely and cut into cubes. If using sponge cake, cut into cubes.
- Macerate the strawberries: In a bowl, gently toss the sliced strawberries with 1/2 cup granulated sugar and lemon juice, if using. Let the mixture sit at room temperature for at least 30 minutes to release juices.
- Make the whipped cream: In a chilled bowl, beat the 2 cups of heavy whipping cream, powdered sugar, and vanilla extract until stiff peaks form. Do not overbeat.
- Assemble the trifles: Select individual clear glasses or small trifle bowls. Create the first layer with a spoonful of cake or biscuit cubes.
- Spoon a layer of macerated strawberries and a small amount of their juice over the cake layer.
- Top the strawberries with a generous layer of whipped cream.
- Repeat the layers: cake, strawberries, and cream, ending with a final dollop of whipped cream on top.
- Chill the assembled trifles for at least 1 hour before serving for the flavors to meld.
Notes
- For a richer flavor, you can use a sweet, slightly dense vanilla sponge cake instead of traditional shortcake biscuits.
- Prepare the strawberries and whipped cream up to 4 hours ahead of time, but assemble the trifles no more than 2 hours before serving for the best texture.
- Garnish the top layer with a whole strawberry or a mint sprig for presentation.
Nutrition
- Serving Size: 1 trifle cup
- Calories: 450
- Sugar: 35
- Sodium: 210
- Fat: 28
- Saturated Fat: 17
- Unsaturated Fat: 8
- Trans Fat: 0.5
- Carbohydrates: 45
- Fiber: 2
- Protein: 5
- Cholesterol: 95